Register Your Scanner
Register your scanner to ensure you get the most out of your investment.

License Agreement
By downloading from Kodak Alaris, you agree to the terms & conditions outlined in the license agreement. Actual file size for multilanguage downloads may vary.
KODAK Software Update Download
The installation process can be complex. Please read the full instructions before downloading.
Version: 1.5.23.01
Scan Station Software UpdateFlatbed Image Processing PatchDriver Patch
KODAK Remote Administration Software
The Remote Administration software (SAT Tool) application is needed to remotely manage Scan Station(s).
Installation Instructions:
Download and Run the RemoteAdmin_SAT_v1.04.07.exe file on the PC that will be used to remotely manage your Scan Stations. If you currently have Version 1.3.42 of the application installed, running the installer will upgrade your SAT installation to Version 1.4.7.
By downloading from Kodak Alaris, you agree to the terms & conditions outlined in the license agreement.
Version: 1.04.07.01
Developer Toolkit
Kodak Alaris has several integration options for our scanners.
We have traditional thick client integration options with our TWAIN and ISIS and WIA drivers as well as an easy to use Scanner SDK.
We also have a state of the art RESTful Web API for integration to our network enabled scanners from any platform without installing host drivers.
Operating System Compatibility Definitions
Supported – KODAK Validated
| Recommended Daily Volume |
Up to 6,000 pages per day |
| Connectivity |
10/100/1000 ETHERNET / No host PC required |
| Native Output Destinations |
FTPS Scan to email Scan to fax server Scan to Kofax Front Office Server Scan to Microsoft SharePoint (on-premise) Scan to portable USB drive Scan to print sFTP |
| Network Protocols |
Authenticated SMTP (login, plain text, CRAM, NTLM) DHCP (or static IP) Network domain authentication SMB TCP/IP |
| Security Features |
Activity logging by Login ID IP port blocking Option to enable/disable the ability to scan to portable USB drives Optional password access Password-protected PDF output PDF private key encryption Secure login via LDAP |
| File Format Outputs |
Encrypted PDF JPEG Hover over me Native scanner and driver file format Not available when scanning with AQIST for FADGI compliant images JPEG-compressed TIFF Microsoft Excel Hover over me Available with bundled applications Microsoft Word Hover over me Available with bundled applications RTF Hover over me Available with bundled applications Single-page TIFF Hover over me Native scanner and driver file format Text searchable PDF Hover over me Available with bundled applications WAV audio files (native) |
| Operator Control Panel |
9.7 inch (24.6cm) graphical color touchscreen LCD with operator control buttons |
| Audio |
Built-in microphone |
| Image Output Resolution Options |
Up to 600 dpi Hover over me Supported DPI: 100, 150, 200, 240, 250, 300, 400, 500, 600 |
| Perfect Page Features |
All-color dropout Autocrop Automatic orientation Content-based blank page removal Deskew Image edge fill Image hole fill Hover over me Not available when scanning with AQIST for FADGI compliant images Streak filtering |
| Barcode Reading |
Codabar Code 128 Code 3 of 9 EAN-13 EAN-8 Interleaved 2 of 5 PDF417 UPC-A UPC-E |
| Throughput Speeds Hover over me Throughput speed may vary depending on your choice of driver application software, operating system, PC and selected image processing features. |
70 ppm / 140 ipm |
| Paper Feeding Error Detection |
Ultrasonic Multifeed Technology |
| Feeder Capacity |
Up to 75 sheets of 80 g/m² (20 lb.) paper |
| Maximum Document Size Hover over me The maximum document size supported by the scanner will vary based on the output image resolution and image compression used. |
216 mm x 863 mm (8.5 in. x 34 in.) |
| Minimum Document Size |
50.8 mm x 63.5 mm (2 in. x 2.5 in.) |
| Paper Thickness and Weight |
34-413 g/m² (9-110 lb.) paper Hover over me Rear exit only for paper > 200 g/m² Hard card thickness up to 1.25 mm (0.05 in.) |
| Approvals and Product Certifications |
Argentina (S mark) Australia/New Zealand (RCM) Canada (cTUVus & ICES-003) China (CCC) European Union (CE) European Union (GS Mark) Taiwan (BSMI) US (cTUVus & FCC) |
| Dimensions and Weight |
Weight: 10.5 kg (23 lbs.) |
| Recommended PC Configuration |
INTEL CORE2 Duo 6600 @ 2.4 GHz Duo Processor or equivalent, 4 GB RAM (Windows and Linux) |
| Operating System Compatibility |
WINDOWS 10 (32- and 64-bit) WINDOWS 7 SP1 (32-bit and 64-bit) Hover over me Customer Validated – no longer tested by Kodak Alaris WINDOWS 8 (32-bit and 64-bit) Hover over me Customer Validated – no longer tested by Kodak Alaris WINDOWS 8.1 (32-bit and 64-bit) WINDOWS VISTA SP2 (32-bit and 64-bit) WINDOWS XP SP3 (32-bit and 64-bit) |
| Accessories and Consumables |
Feed Module KODAK A3 Size Flatbed Accessory KODAK Legal Size Flatbed Accessory KODAK Scan Station Keyboard and Stand Accessory Roller Cleaning Pads |
| Environmental Certification |
ENERGY STAR Qualified |
| Power Consumption |
Running: less than 50 watts Sleep Mode: less than or equal to 5.26 watts |
Register your scanner to ensure you get the most out of your investment.
Job settings are modified using the Scanner Administration Application. After a Job has been defined and the configuration has been uploaded to the Scan Station, only the Jobs screen will display on the Scan Station (the normal user interface will not display)
You can access the manual mode after you remove all entries for Jobs in the configuration file (using the Scanner Administration Application). Or, you can also access the manual mode after inserting a USB drive that contains the configuration file (kss.xml). The configuration file can be exported from the Scanner Administration Application and must be named “kss.xml”. This file must also be located at the root (top) level of the USB drive.
You do not need a computer to use the Scan Station; however, you need a computer to create a configuration file, and to install and use the Scanner Administration application. There are two methods for configuring the Scan Station:
Yes, the Scan Station 700 series has four USB ports and one Ethernet port. The USB ports are used for storing files to a thumb drive, accessing administrator settings, configuring the Scan Station, and connecting a USB Keyboard.
There are two ways to find this information:
For information on how to contact Kodak Alaris support, please visit Kodak Alaris Services and Support.
To reset the configuration settings:
You may be asked by service personnel to provide log files to help diagnose an issue. You can send log files as an attachment to an email.
There are two ways to obtain log files:
Using the Scanner Administration application:
Using a USB drive:
You can use the microphone to create voice annotations that you can send via email as an attachment. You can also send a separate voice annotation file to any destination except a printer.
The Jobs mode lets you set up a combination of predefined scan settings, destinations, and groups of users. A job displays as a button on the Scan Station user interface and provides one-touch scanning. After you set up a Job (or Jobs), only the Job button(s) display on the Scan Station.
For information about accessories, contact us.
The Scanner Administration application lets you create configuration files, and communicates with Scan Station devices on the network; this application minimizes the need for individual access to multiple Scan Stations. You need to install the Scanner Administration application on the host computer to set up and work with the Scan Station. The following tabs are available in the application:
The Scan Station supports the following languages: English, French, Italian, German, Spanish-International, Portuguese-Brazilian, Dutch, Czech, Russian, Turkish, Polish, Greek, Romanian, Hungarian, Japanese, Korean, Chinese-Simplified, and Chinese-Traditional.
Follow these steps:
The Scanner Administration application used with the Scan Station requires the Host computer to have one of the following Operating Systems and MICROSOFT .Net 4.0 Framework installed (this program will be automatically installed if not detected).
You must have administrative rights to install the application on the Host computer.
1. Wipe the upper and lower imaging area using a Staticide wipe. Be careful not to scratch the imaging area when cleaning.
IMPORTANT: Staticide wipes contain isopropanol which can cause eye irritation and dry skin. Wash your hands with soap and water after performing maintenance procedures. Refer to the MSDS for more information.
2. Wipe the upper and lower imaging area again using the reusable optics cleaner pad to remove any streaks.
3. When finished, close the Scan Station cover with both hands
1. Open the Scan Station cover.
2. With a roller cleaning pad, wipe the feed rollers from side to side. Rotate the feed rollers to clean the entire surface.

IMPORTANT: The roller cleaning pad contains sodium lauryl ether sulfate which can cause eye irritation. Wash your hands with soap and water after performing maintenance procedures. Refer to the MSDS (Material Safety Data Sheet) for more information.
3. Dry the rollers with a lint-free cloth.
NOTE: The paper present sensor is located to the left of the feed module. Be careful not to damage the paper present sensor when removing or cleaning around the feed module.
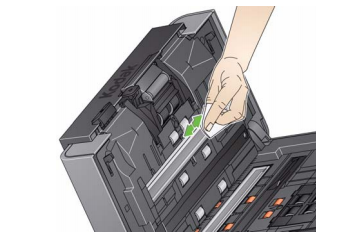
1. Pull against the raised edge of the feed module cover and lift it up and out of position.
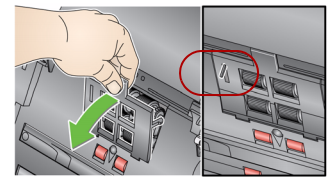
2. Rotate the feed module forward and push it to the left to lift it out of position.

If you are replacing the feed module, insert the new feed module by aligning the pins and pushing it toward the left to fit it into position. Be sure the gears are aligned and it snaps into place, then go to Step 8.
If you are replacing the tires, continue with Step 3.
3. Remove one core assembly by lifting up and out of position.
4. Remove each tire by sliding the tire off the core.
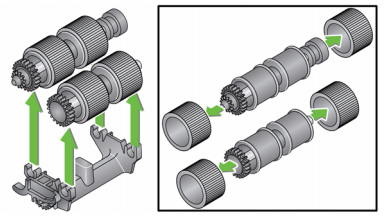
5. Install each new tire by gently pulling it over the core. IMPORTANT: Do not overstretch the tire; it may tear.
6. Replace the core assembly in the feed module. You may need to slide the shaft to the right or left so the core fits properly within the feed module housing.
7. Repeat the replacement procedure outlined above for the other core assembly.
8. Reinstall the feed module by aligning the pins and pushing it toward the left to fit it into position.
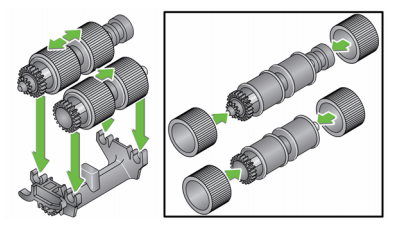
9. Reinstall the feed module cover by aligning the tabs in the slots and pushing the feed module cover down until it snaps into place.
1. Remove the separation module from the Scan Station by following the steps previously described in “Replacing the separation module and tires”.
2. Hold the separation module in both hands and locate the two tabs which protrude slightly from the back of the separation module.
3. Push down on the tabs until the pre-separation pad protrudes slightly from the front of the separation module.
4. Grasp the pre-separation pad and pull it out of the separation module.
5. Discard the worn pre-separation pad.
6. Align the side tabs of a new pre-separation pad with the slots on the separation module.
7. Push the pre-separation pad firmly in the slots until the preseparation pad flap rests lightly against the separation module tires.
8. Reinstall the separation module by aligning the tabs with the slots and snapping it into position.
For information about preventing paper jams, see Chapter 11 and 12 of the Administrator’s Guide.
For information about available materials, see the Supplies and Consumables Catalog for scanners from Kodak Alaris.
Watch the following videos to do a UDDS Calibration.
UDDS calibration for version 1.3.67 or later.
UDDS calibration for versions prior to 1.3.67
Follow these steps:
Follow these steps:
The KODAK Scan Station 710 and Scan Station 730EX contain non-volatile and volatile memory.
These products store image data temporarily to the internal hard drive while scanning. This image data is immediately deleted upon complete delivery of the scanning job. In the event of a system failure which causes the application to abnormally terminate, all cached data is deleted upon the restarting of the Scan Station application.
Customer image data may persist in non-volatile memory in the operating system paging file. Any image data that is cached in the paging file is deleted when the system is shut down as part of the shutdown sequence. Non-volatile memory is cleared at the end of each scan job, and again when the device is started. Scanner settings - which can include network authentication credentials (user name and password), Scanner Configuration, and Destination Configuration data are all stored in encrypted form in non-volatile memory.
Contact your Reseller to purchase supplies and consumables. If you don't know who your reseller is, please complete the Ask a Question form.
Want to recycle? Kodak Alaris offers recycling services.
Have a question? Fill out the information and someone will contact you soon.


