Register Your Scanner
Register your scanner to ensure you get the most out of your investment.

License Agreement
By downloading from Kodak Alaris, you agree to the terms & conditions outlined in the license agreement. Actual file size for multilanguage downloads may vary.
Windows
The installation process can be complex. Please read the release notes before downloading. By downloading from Alaris, you agree to the terms & conditions outlined in the license agreement. Actual file size for multilanguage downloads may vary.
Operating Systems tested on:
Windows Full CD Firmware - Web Browser (.sig)Firmware - Windows
Smart Touch for i1100WN Series Scanners
Smart Touch software allows you to easily create searchable PDF's (or other types of images) and send the document to a file location or common cloud services with the touch of a button.
Please read the release notes before downloading. By downloading from Kodak Alaris, you agree to the terms & conditions outlined in the license agreement.
Version:
Smart Touch Export Tool
Installing the Smart Touch Export Tool installs the tool used to export your Smart Touch setting shortcuts from one computer to another. This tool is only for Windows Operating Systems.
Capture Pro Software Limited Edition
Capture and index your critical data and send smarter information to ECM systems and business applications to streamline your workflows and processes.
Kofax VRS Support
The KODAK SCANMATE i1150WN and i1190WN Scanners have been certified by Kofax with the following VRS versions:
VRS Elite 5.1 (component installer update required)
For more information see the Kofax Scanner Configurator.
Version: 5.1
Developer Toolkit
Kodak Alaris has several integration options for our scanners.
We have traditional thick client integration options with our TWAIN and ISIS and WIA drivers as well as an easy to use Scanner SDK.
We also have a state of the art RESTful Web API for integration to our network enabled scanners from any platform without installing host drivers.
Operating Systems
Operating System Compatibility Definitions
Supported Operating Systems
The ScanMate+ App
Use the ScanMate+ Mobile App to quickly and easily send documents from your scanner to your mobile device.
The Info Input Mobile App is very simple to administer. Workflows are pre-defined and configured on a server. Then, these automated data processes can be made accessible from the app that can be downloaded on iOS and Android devices. Once the user has finished their job and finished collecting the data, they can select the ready built process, take a photo of the filled form or key data, and check the image quality before this data is pulled into the process.
| Connectivity |
10/100/1000 ETHERNET USB 2.0 Hover over me This product has been tested and certified by USB.org USB 2.0 compatible USB 3.2 Gen 1x1 Hover over me USB 3.2 Gen 1x1 = USB 3.1 Gen 1 = USB 3.0 (5Gbps) Wireless Network 802.11 b/g/n and 10/100 Ethernet |
| Barcode Reading |
Codabar Code 128 Code 3 of 9 EAN-13 EAN-8 Interleaved 2 of 5 PDF417 UPC-A UPC-E |
| File Format Outputs |
BMP Hover over me Native scanner and driver file format Not available when scanning with AQIST for FADGI compliant JPEG Hover over me Native scanner and driver file format Not available when scanning with AQIST for FADGI compliant images Multipage TIFF Hover over me Available with bundled applications PDF Hover over me Available with bundled applications PNG Hover over me Available with bundled applications RTF Hover over me Available with bundled applications Single-page TIFF Hover over me Native scanner and driver file format Text searchable PDF Hover over me Available with bundled applications |
| Throughput Speeds Hover over me Throughput speed may vary depending on your choice of driver application software, operating system, PC and selected image processing features. |
40 ppm / 80 ipm |
| Recommended Daily Volume |
Up to 5,000 pages per day |
| Paper Thickness and Weight |
34-413 g/m² (9-110 lb.) paper Hover over me Rear exit only for paper > 200 g/m² |
| Feeder Capacity |
Up to 75 sheets of 80 g/m² (20 lb.) paper |
| Image Output Resolution Options |
Up to 1200 dpi Hover over me Supported DPI: 100, 150, 200, 240, 250, 300, 400, 500, 600, 1200 Up to 600 dpi Hover over me Supported DPI: 100, 150, 200, 240, 250, 300, 400, 500, 600 |
| Power Consumption |
Running: less than 21 watts Standby: less than 0.5 watts |
| Environmental Certification |
ENERGY STAR Qualified EPEAT Silver |
| Operating Temperature and Humidity |
Operating Humidity 15% - 80% RH Operating Temperature 15-35° C (59-95° F) |
| Acoustical Noise |
Off or Ready mode: < 20 dB(A) Scanning: <50 dB(A) |
| Electrical Requirements |
100-240 V (International); 50-60 Hz |
| Dimensions and Weight |
|
Register your scanner to ensure you get the most out of your investment.
Yes, they are compatible and provided a USB cable in the box.
Yes; however, when you use “https,” you will receive a warning that your connection is not private, or that the certificate provided by the website was not issued by a trusted certificate authority. (This error can occur because Alaris cannot provide certificates for individual, isolated ad hoc connections for each scanner.)
We recommend that you accept the warning to continue to the website. Data encryption will be provided on your local network.
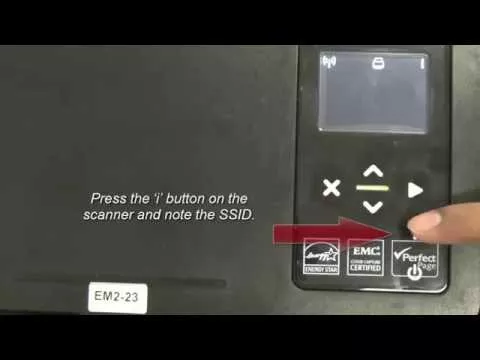
→A PC is not required to setup or use the scanner. (Hit the ‘i’ button)
→An EasySetup page can be used to setup the scanner
→You can configure your i11xxWN scanner from a mobile device browser
You may be able to obtain these settings by following these steps:
Right-click your wireless network connection, then select Status. The SSID will display in the Connection section of the Status Screen.
Click the “Show characters” check box to view the security key/password.
For information on how to contact Kodak Alaris support, please visit Kodak Alaris Services and Support.
Two ways to factory reset
1. Using the reset button on the back of the scanner
Turn off the scanner by pressing the power button. Press and hold the reset button ![]() at the back of the scanner and press the power button. Continue holding the reset button until the scanner completely powers on and the Operator Control Panel (OCP) displays “Configuration Reset to default.” This will reset all the settings to the factory default
at the back of the scanner and press the power button. Continue holding the reset button until the scanner completely powers on and the Operator Control Panel (OCP) displays “Configuration Reset to default.” This will reset all the settings to the factory default
2. Using EasySetup page
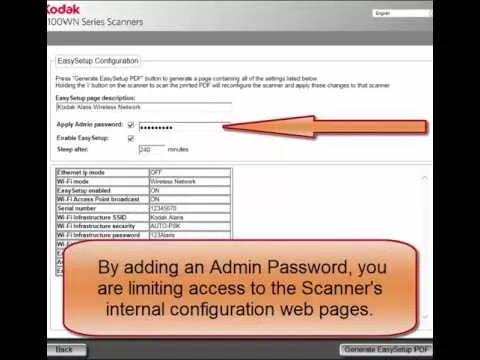
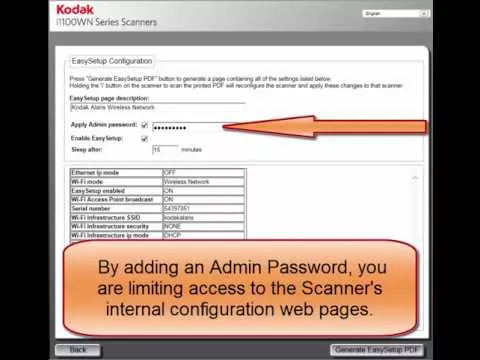
→ Create an EasySetup sheet with the factory default setting and it can be used whenever you want the scanner to reset with factory defaults.
→ To use the EasySetup sheet just press and hold the ‘i’ button on the scanner until the OCP displays “Scanner in use by EasySetup.” Place the EasySetup sheet in the input tray and press the scan button. Once the scanning is done, the OCP will display “EasySetup Successful”

If you are using Smart Touch it will allow you to select many destinations and file types for the storage of your scanned documents.
If you are using a third party application which supports TWAIN and ISIS drivers, then you will be able to save into different file formats.
Refer to the User's Guide for Smart Touch for information about using this software.
For information on how to change the connectivity of the scanner, refer to the How To section.
Wait for current scanning job to finish, or cancel the current user’s session by pressing the X button on the scanner
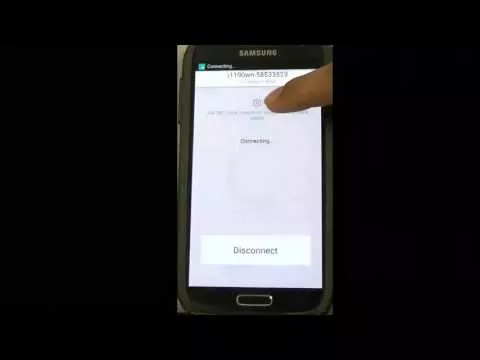
Power On the scanner. Press the ‘i’ button to note the scanner’s Wireless directly (ad hoc) SSID. Download the mobile app of the scanner for Apple iOS and Android devices. Connect your mobile app to the scanner’s SSID network and scan. If any encryption is enabled on the ad hoc network, then the Security Key will be required to connect the mobile device to scanner. No other steps required other than to load the app.
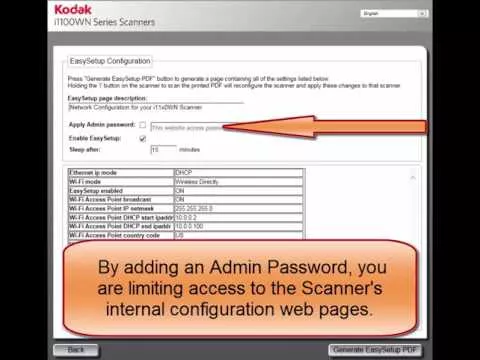
EasySetup is a process that generates a secure barcode of the network and device settings that can be configured on the scanner. This secure barcode sheet when scanned on a scanner will automatically set the scanner to the same settings. Refer to the User’s Guide for more information. This can be created from: www.kodakalaris.com/go/EasySetup.
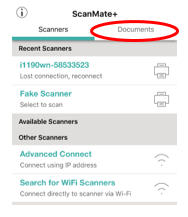 | Android /iOS: Inside ScanMate+ application → ‘Documents’ section |
Documents are shared in PDF format for compatibility with many applications.
The range of the scanner’s Wireless Network Card can vary based on the work environment and obstructions. Even the use of a microwave can cause a momentary drop of signal quality. 75ft./25m is the maximum range of the scanner’s inbuilt Wireless Network Card.
This is a Kodak Alaris application to test connectivity and gather diagnostic information.
When the user presses ‘i’ button on the scanner’s OCP it displays information like:
It is also used when you want to scan an EasySetup page.
Documents are shared in PDF format for compatibility with many applications.
EasySetup pages can be stored at any location as per user’s choice. The path that opens up will be your browser’s default Downloads folder.
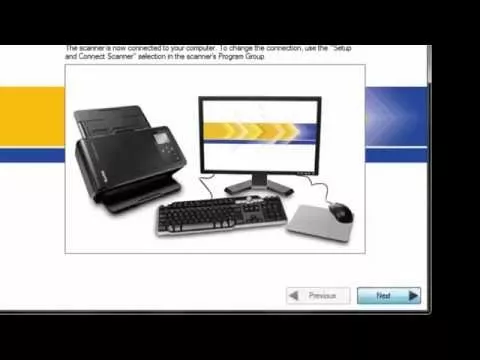
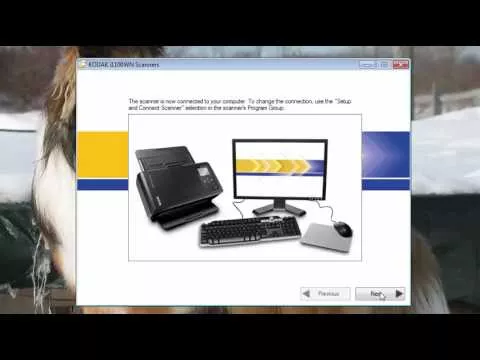
Go to Start → All Programs → Kodak → Document Imaging → i11xxWN → Setup and Connect Scanner.
Run the Setup and Connect Scanner and follow the steps as per the wizard.
You can change the connection modes like Wired Ethernet, Wireless network and Wireless directly (ad hoc) from the scanner’s webpage (IP address to which the scanner is configured).
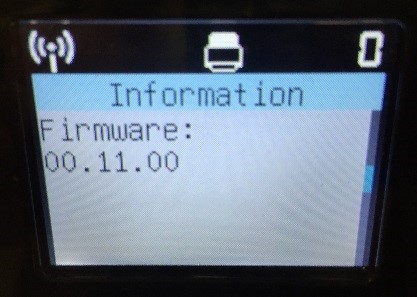
On Scanner:
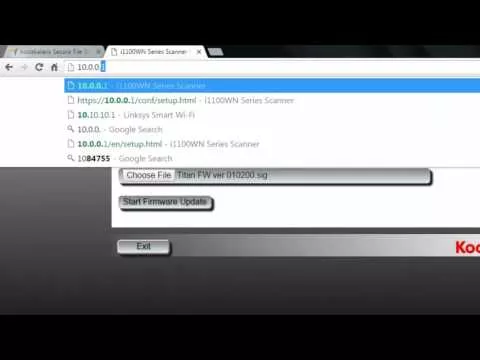
Press the ‘i’ button on the scanner and press the down arrow until you see the Firmware version installed on the scanner.
On PC/Laptop:
Login into the scanner’s webpage and click on the ‘Status’ tab. It will display all the settings that are currently selected for the scanner including firmware version.
For the software version open Control Panel → Program and Features. KODAK i11xxWN Scanners

| IOS | Android |
| 8.4 | 4.2 (Jelly Bean) |
| 9.0 | 4.4 (KitKat) |
| 9.2 | 5.0 (Lollipop) |
| 9.3 | (5.1 (Lollipop) |
| Wireless Directly (ad hoc) | Wireless Network |
| WPA Personal [TKIP] | WEP (Not Secure) |
| WPA2 Personal [AES] | WPA/WPA2 Personal |
| WPA/WPA2 Personal |
The recommended protocol for use of our scanner is WPA/WPA2 Personal. Our scanner will first attempt WPA2 Personal [AES], then fall back to WPA Personal [TKIP]. AES is an encryption algorithm, and TKIP is an integrity check.
If the scanner was configured with an IP address that is DHCP. There is a possibility of the DHCP address getting changed over time. To avoid this scenario, you can make the IP address static or create a DHCP reservation.
In this scenario, when you start to configure your scanner and reach to the point when you select “Use Scanner” and the next page that is displayed is as follows: Select “Use Previously Configured Network”
The next page will ask for an IP address; Press ‘i’ button on the scanner and note the Wireless / Wired IP address. And write down this IP address in the Text box in the installation tool. And click Next.
This will direct you to the Scanner’s webpage. You can make this IP address static by clicking on the “Use the following IP address” radio button.
Fill in the information and save the settings and this will make you scanner’s IP address static. Go back to the installation tool and finish the configuration.
The scanner is designed in such a way, when a user is accessing it through USB the scan button is not required as it is dedicated to just one user.
When using it in Wireless / Ethernet mode, the scanner can be shared among multiple users. So a session has to be locked when it’s used by an individual user. This feature enables you to confirm who the user is that holds the scanner locked before putting the document into the scanner. The scanner will display the ID of the user who has locked the scanner.
When Hosts initialize which have installed TWAIN drivers configured to use a i1100WN scanner the scanner will be locked a number of times as the Host boots and that application gathers data. This will take a few lock sessions per host. So if a number of Hosts sharing a scanner are rebooted etc. this behavior can be observed on the scanners OCP and that is normal.
Some web browsers may not display the EasySetup document, but would enable you to save the PDF to your system. Check and see if pop up blockers are enabled (turned on) in the settings for your browser. If they are enabled (ON) then disable them (turn OFF).
If an exclamation mark is displayed over the Wireless icon, wait at least 1-2 minutes.
Remove Staple pins, clips or any other accessories that can be used to attach papers.
For information about available materials, see the Supplies and Consumables Catalog for scanners from Kodak Alaris.
The scanner will automatically wake up if you initiate a scan from PC or Mobile device.
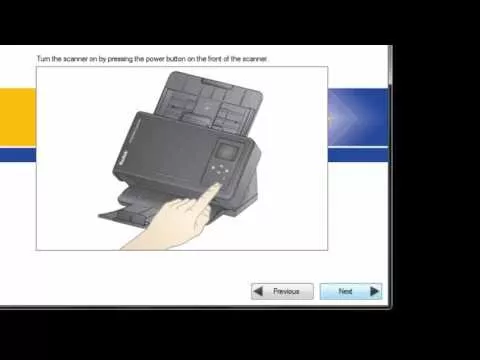
To wake up the scanner from sleep mode press any button on the scanner’s front panel or insert a paper in the input tray.
Wait – few minutes based on the environment wait time can be extended.
Recheck PC network selection. This can change based on PC network priority settings.
The settings entered for the wireless network may be invalid, the wireless directly (ad hoc) (router) settings may have changed or the scanner is no longer in range of the access point (router). First move the scanner closer to the wireless directly (ad hoc) (router) to see if a connection is established. If this is unsuccessful reset the scanner to defaults (for more information refer to, “how do I reset to factory defaults?” FAQ) then refer to the Setting Up and Connecting Your Scanner section of the User’s Guide.
The DNS does not resolve the name across subnets. You can use a DHCP reservation to avoid this issue.
Wireless connectivity is for multiple users and USB is for a single dedicated user. When the scanner is connected via USB it turns off the discovery of wireless network and disables the wired network, but it can still function in Wireless directly (ad hoc) mode. Mobile devices will still work wirelessly as long as the wireless switch is ‘On’.
Disconnecting the USB cable or powering down your PC will re-enable the wired network or discovery on your wireless network connection.
Protecting Customer Information — Scanners from Kodak Alaris process scanned data exclusively through volatile memory ensuring image data is effectively erased upon shut down.
This scanner contains non-volatile storage (NVRAM), and volatile memory (SDRAM).
Volatile memory is used to store customer image data. It is erased when the device is turned off.
Non-volatile memory is used to store program data, scanner settings, and scanner calibration data. No customer image data is stored in non-volatile memory.
The only scanner settings stored permanently are the Energy Star settings. No other customer data is stored in the non-volatile memory.
NOTE: The image data is passed to a PC which has its own ability to store images and information. The customer will also need to consider what precautions must be taken to secure the data on the PC.
Contact your Reseller to purchase supplies and consumables. If you don't know who your reseller is, please complete the Ask a Question form.
Want to recycle? Kodak Alaris offers recycling services.
Have a question? Fill out the information and someone will contact you soon.